> ## Documentation Index
> Fetch the complete documentation index at: https://www.renderjuice.com/docs/llms.txt
> Use this file to discover all available pages before exploring further.
# Using add-ons and extensions with Renderjuice
> Step-by-step guide to zipping, uploading, and using your custom Blender add-ons and extensions for rendering on Renderjuice.
This guide will help you prepare and use your custom addons for rendering on our platform. By the end of this guide, you’ll be able to upload your addons, and integrate them seamlessly into your render jobs.
While we continue improving this workflow, some add-ons still require extra setup depending on how they store data or caches. We have successfully tested it with the following addons:
* **PSA**
* **Flip Fluid**
* **Shakify**
* **Nishita Sky**
* **Geo Scatter**
And following extensions:
* **Noise Nodes**
If you encounter any issues, please don’t hesitate to contact our support team.
## Instructions
To use add-ons with Renderjuice, you need to zip your add-on folders and upload them to your Renderjuice account.
Before uploading your add-on, you need to make sure it's working as expected locally.
* Ensure your add-on is working as expected locally, by rendering a frame. Set the sample size to lower values to speed this up.
* Once you've confirmed it's working, zip the add-on folder from your local Blender add-ons or extensions directory and prepare to upload.
* Ensure that you don't change the folder name when zipping it.
Upload the add-on folder that is already installed on your machine. Do not upload the original installer or download archive from the add-on website unless that archive is the exact same folder already installed in Blender.
If you use [Blend Project Packer](/renderjuice-101/blend-project-packer),
its **Bundle Selected Add-ons** option can copy selected installed add-ons into
`addons/legacy/*.zip` or `addons/extensions/*.zip` inside the packed project.
Those generated zips can be uploaded on the Renderjuice Add-ons page, but they
still must be uploaded, validated, and selected in the render job separately.
You can find the add-on folder here:
To show hidden files in File Explorer:
```
View > Show > Hidden items
```
Then navigate to:
```bash Legacy add-ons theme={null}
%appdata%\Blender Foundation\Blender\[blender version]\scripts\addons\
```
```bash Extensions theme={null}
%appdata%\Blender Foundation\Blender\[blender version]\extensions\
```
To show hidden files in Finder:
```
Command + Shift + Dot
```
Then navigate to:
```bash Legacy add-ons theme={null}
/Users/[user]/Library/Application Support/Blender/[blender version]/scripts/addons/
```
```bash Extensions theme={null}
/Users/[user]/Library/Application Support/Blender/[blender version]/extensions/
```
To show hidden files in Nautilus:
```
View > Show hidden files
or
press Ctrl + H
```
Then navigate to:
```bash Legacy add-ons theme={null}
$HOME/.config/blender/[blender version]/scripts/addons/
```
```bash Extensions theme={null}
$HOME/.config/blender/[blender version]/extensions/
```
After you've zipped your add-on, you can upload it to Renderjuice.
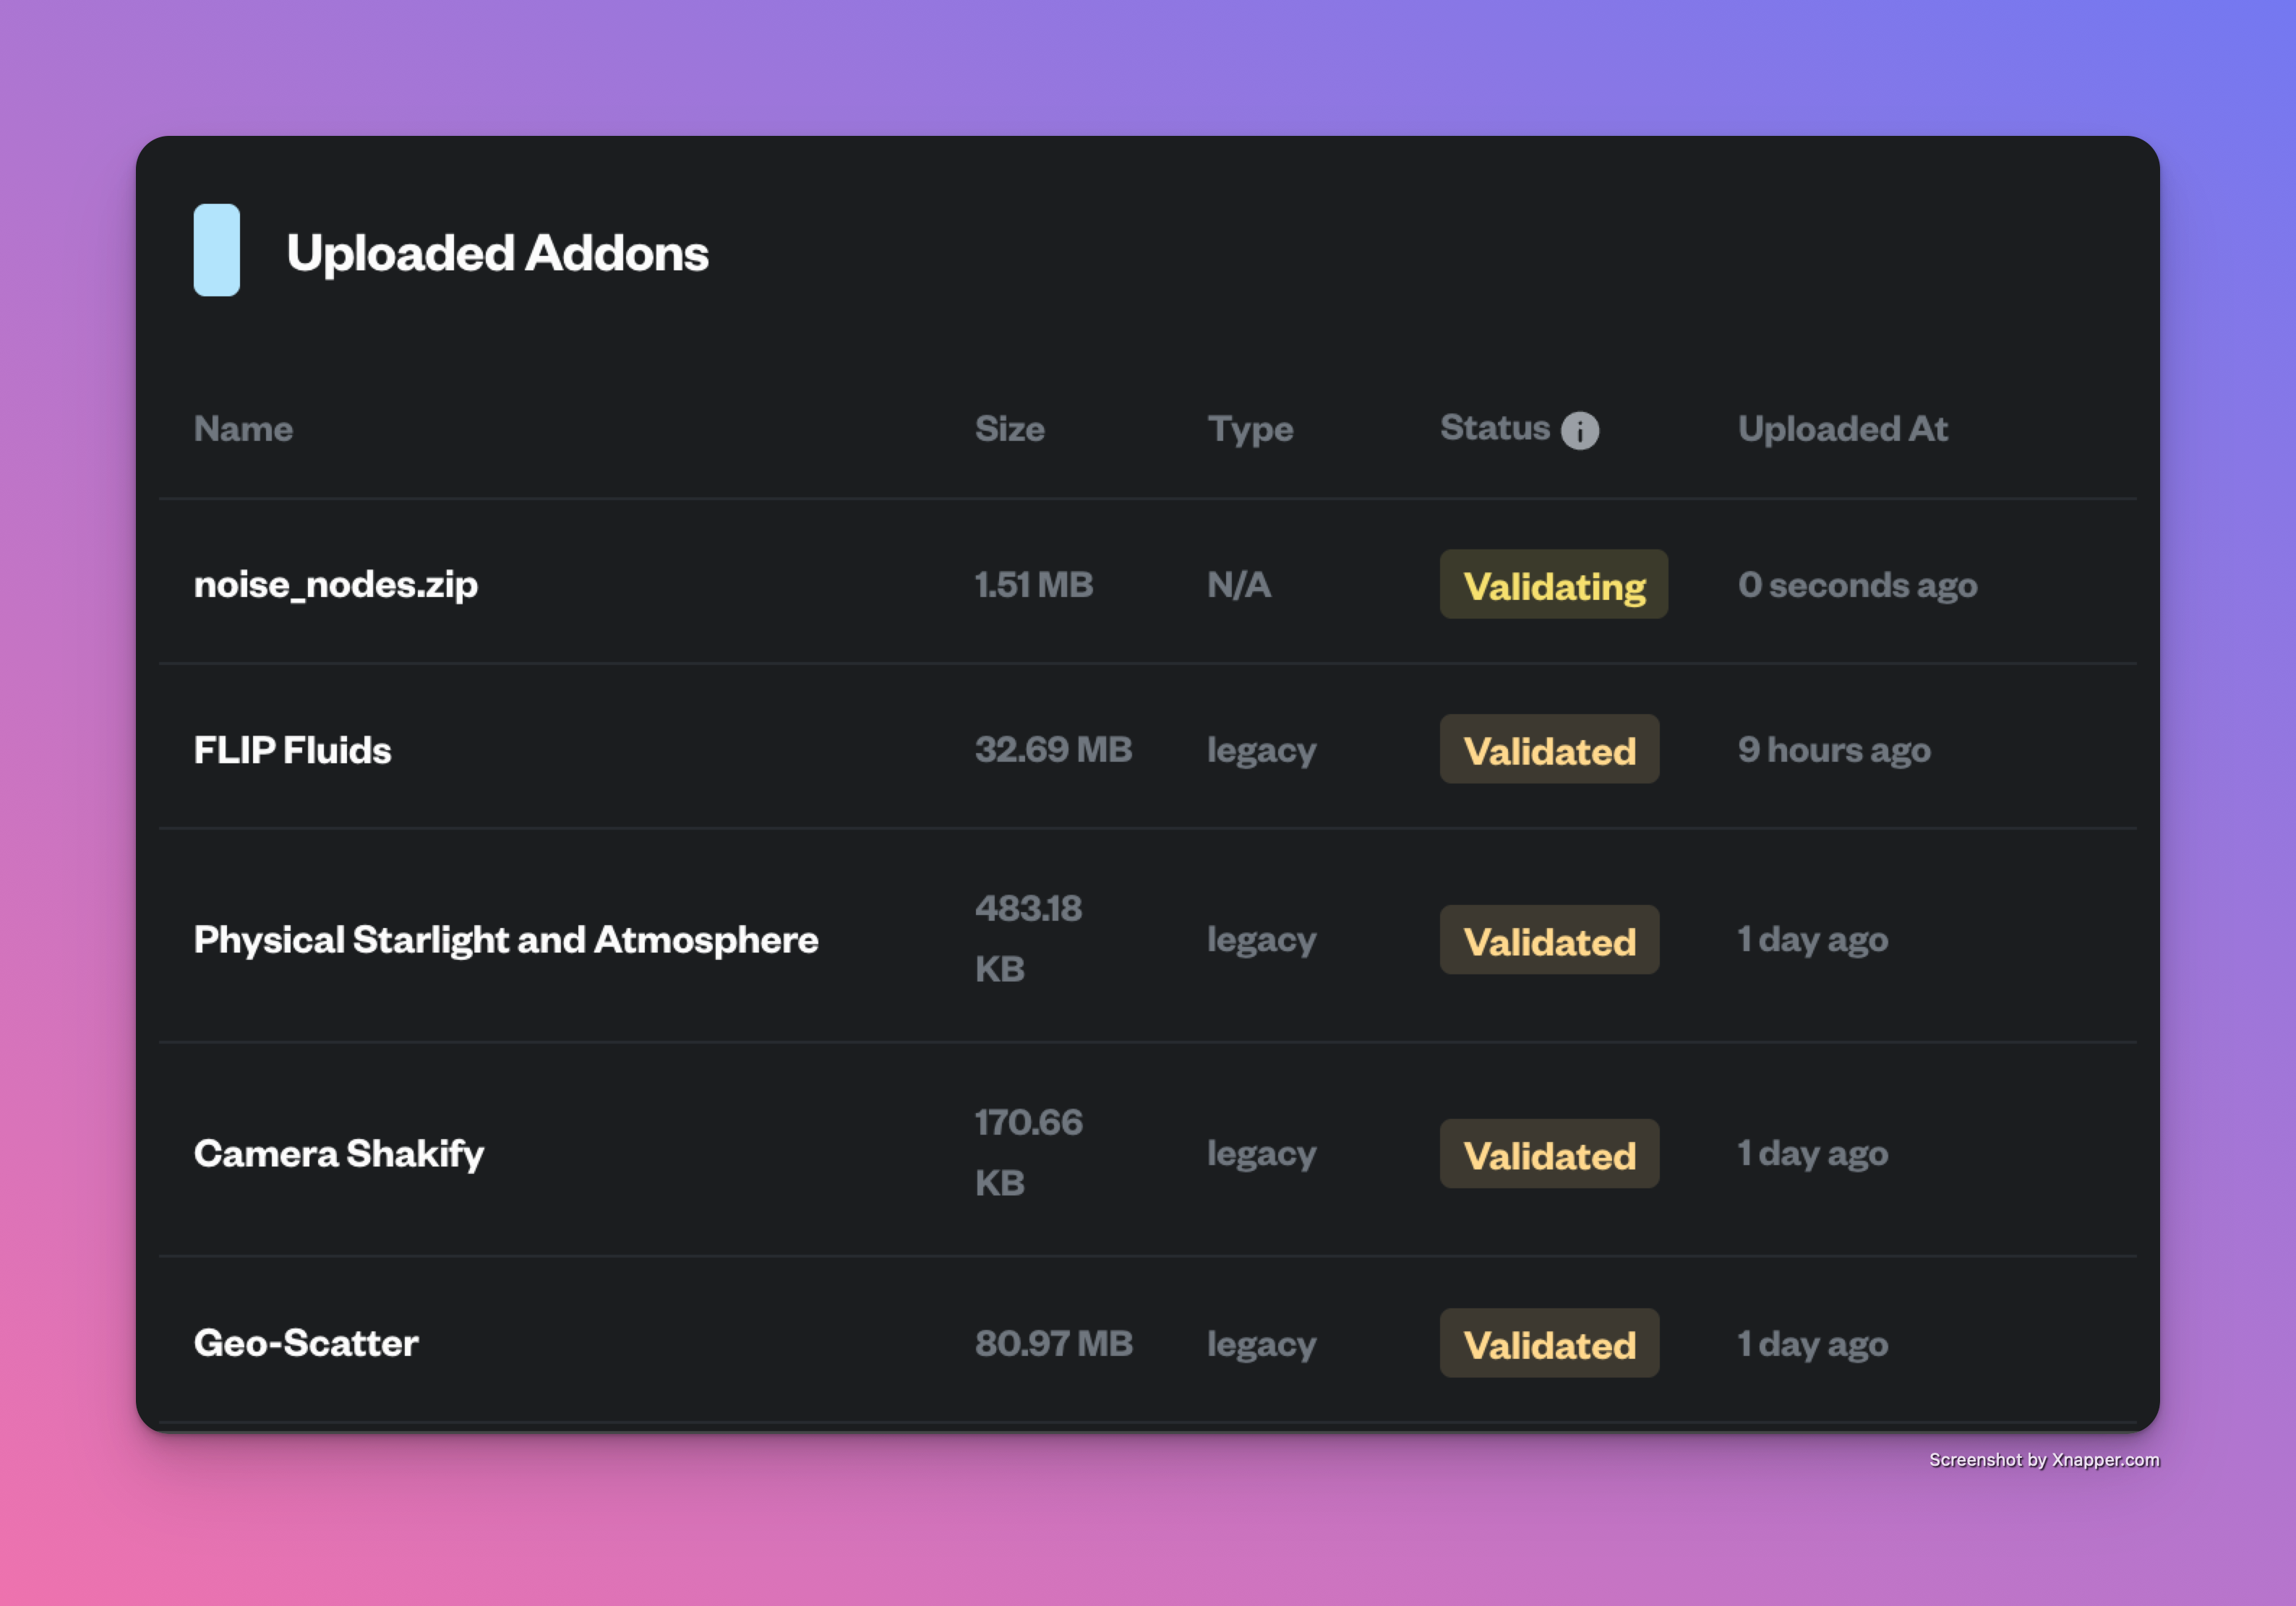
1. Login to [app.renderjuice.com](https://app.renderjuice.com) and navigate to the [Add-ons](https://www.app.renderjuice.com/addons) page.
2. **Drag and drop** or click **Upload** to upload the addon zip file.
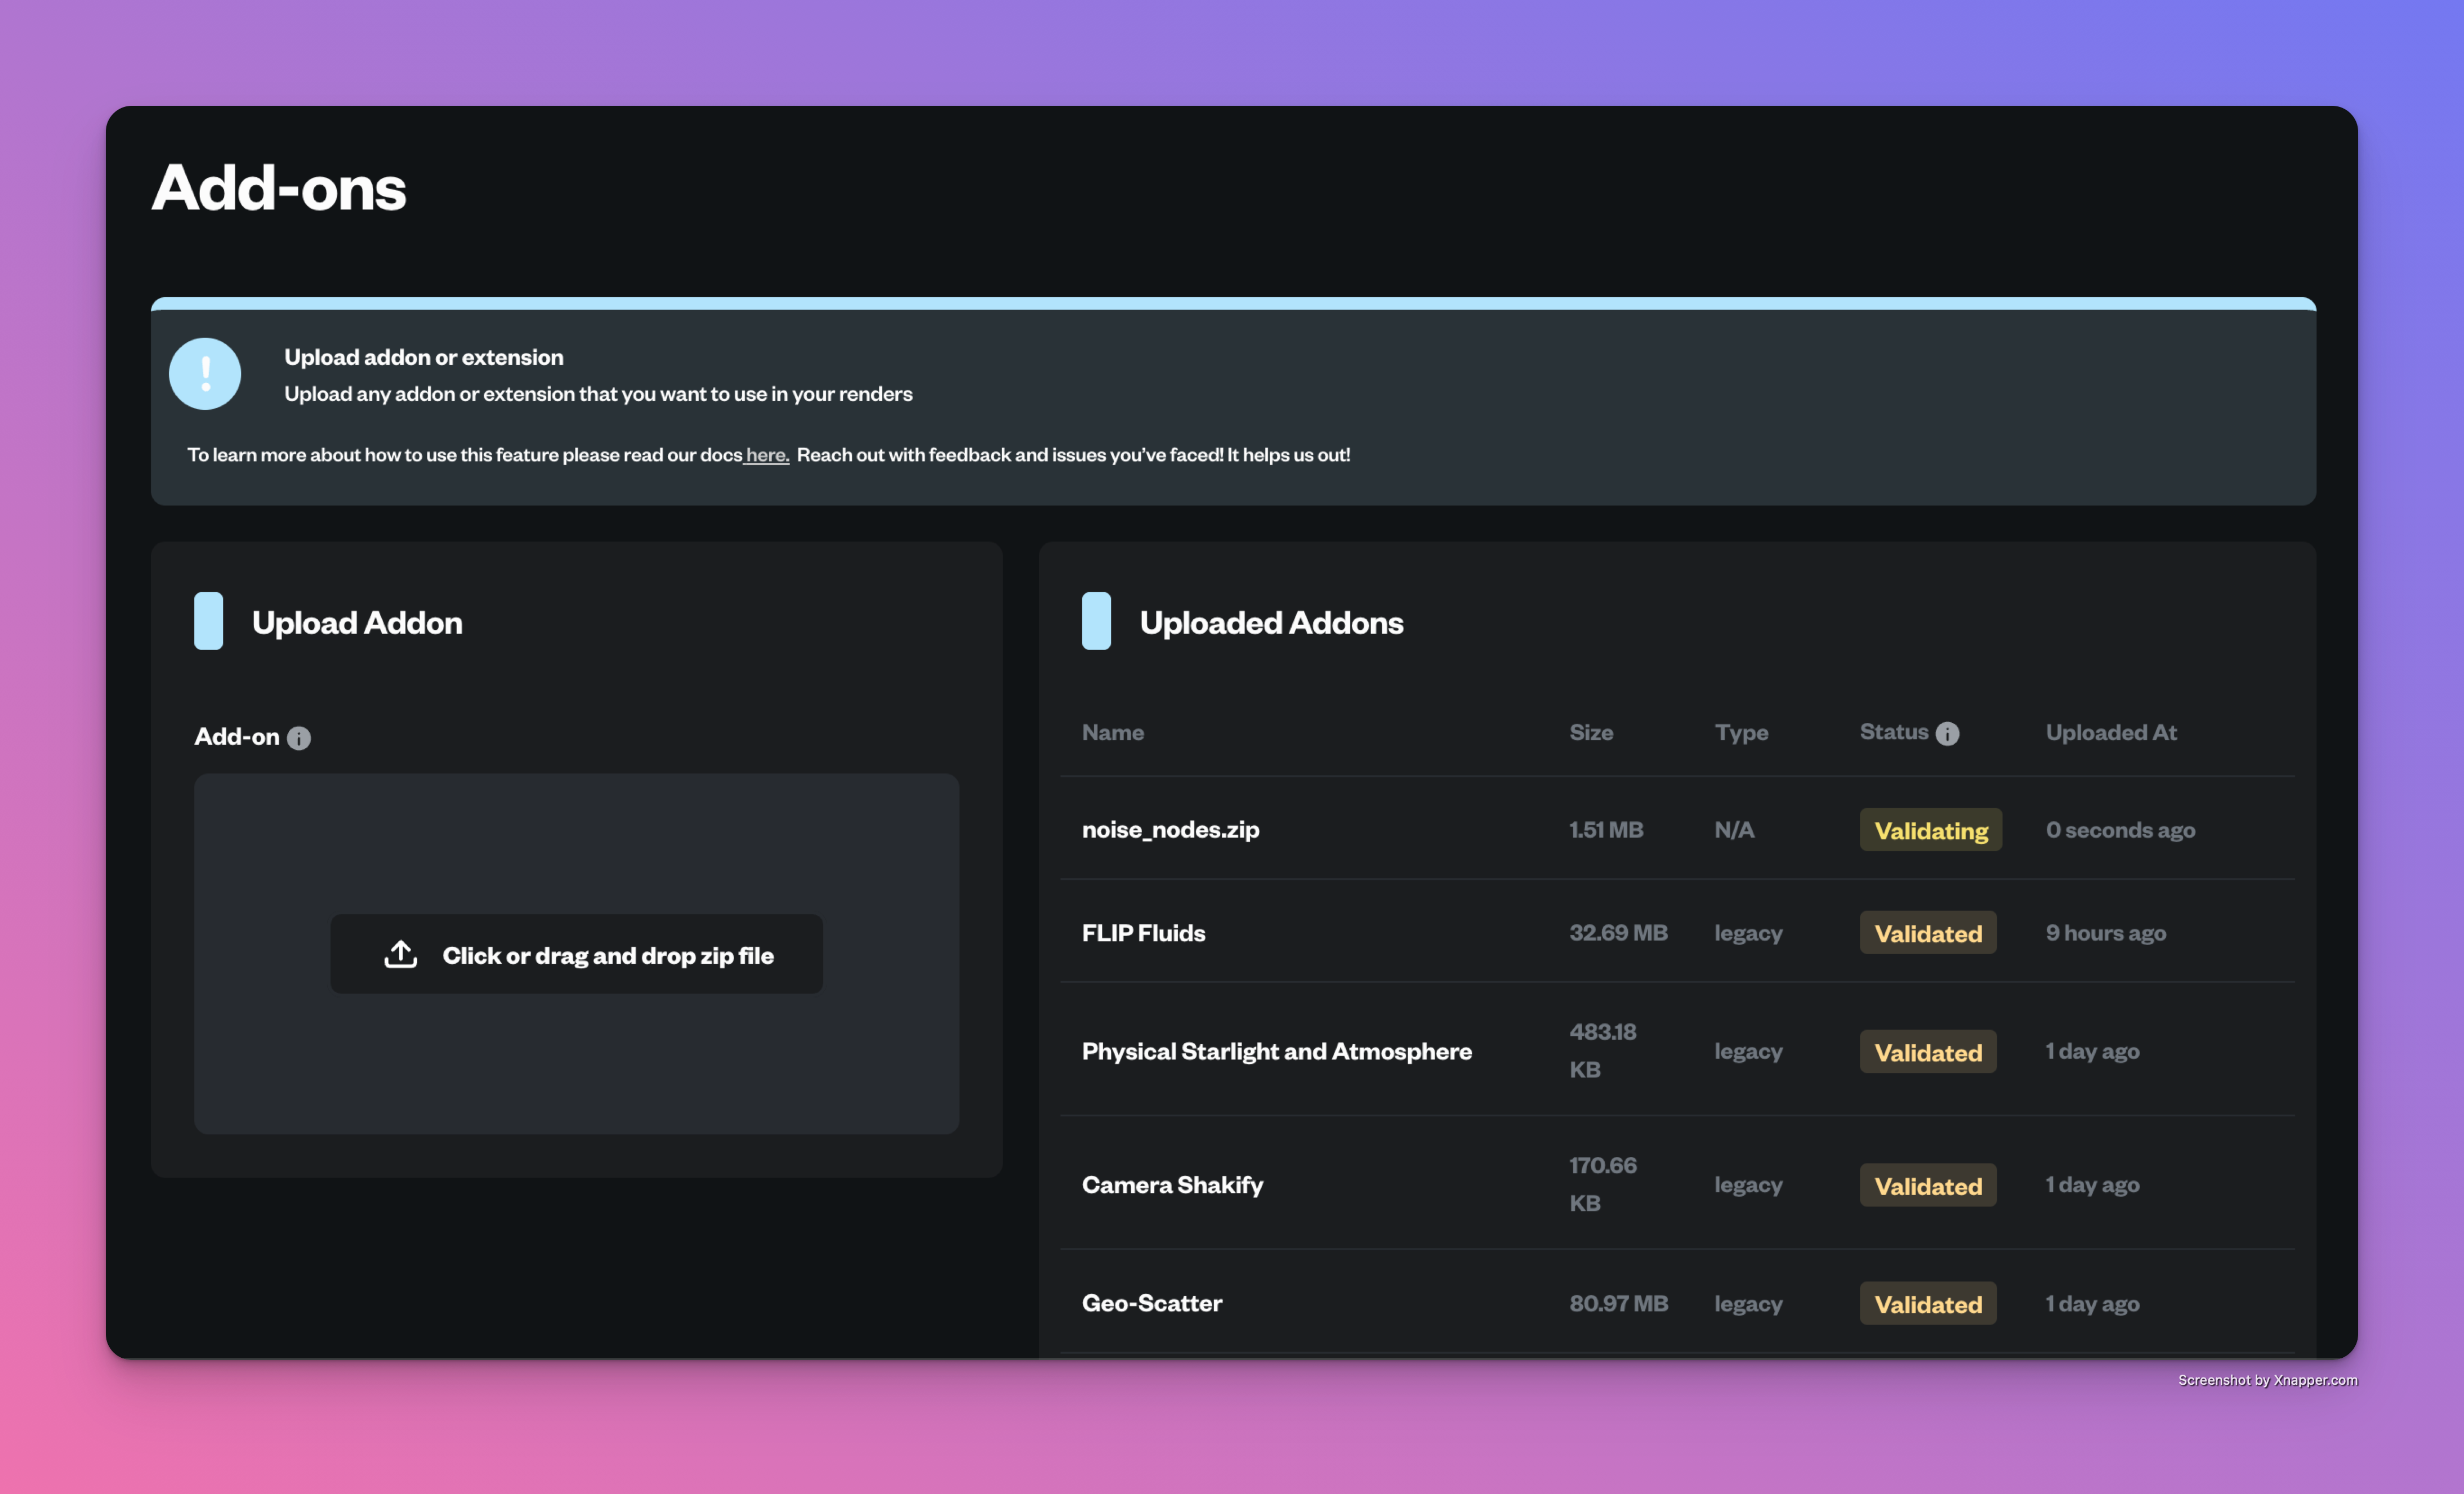 3. Once uploaded, you can see your add-on in the list of uploaded add-ons in the **Add-ons** page. Wait for it to finish validating before using it in a render job.
 Great job! Now you can use your add-on in a render job.
1. Navigate to the **Home** page.
2. Upload your blend file or choose one from recently uploaded.
3. It will redirect you to the **Configure Render** page to set your render parameters.
Great job! Now you can use your add-on in a render job.
1. Navigate to the **Home** page.
2. Upload your blend file or choose one from recently uploaded.
3. It will redirect you to the **Configure Render** page to set your render parameters.
 4. In the **Add-ons** section, you can select the add-on you uploaded to use.
* If your addon isn’t listed, click the **Upload Addon** button to upload it.
* This opens the Addons page in a new tab.
* After uploading the addon and when it finishes validating, return to your render configuration tab, where the newly uploaded addon will now be selectable.
4. In the **Add-ons** section, you can select the add-on you uploaded to use.
* If your addon isn’t listed, click the **Upload Addon** button to upload it.
* This opens the Addons page in a new tab.
* After uploading the addon and when it finishes validating, return to your render configuration tab, where the newly uploaded addon will now be selectable.
 5. Click **Continue** to **validate** your scene and start your **render** 🎉.
Monitor the render to ensure your add-on is working as expected, if any issue detected cancel the render, to avoid wasting credits.
## What statuses mean
* **Validating** - Renderjuice is checking the archive structure and addon metadata.
* **Validated** - The add-on is ready to be selected in a render job.
* **Failed** - The archive could not be validated. Review the error in the Add-ons page, fix the archive, and upload it again.
## Common mistakes
* Uploading the original installer or website download archive instead of the installed add-on folder from Blender.
* Renaming the add-on folder before zipping it.
* Trying to use the add-on before validation finishes.
* Leaving packer-bundled add-on zips inside the project upload and expecting
Renderjuice to install them automatically.
* Assuming the add-on archive is enough when the scene also depends on baked caches or simulation data.
## Important Notes
* Monitor the render to ensure your add-on is working as expected, if any issue detected cancel the render, to avoid wasting credits.
* For some addons e.g Flip Fluid, you need to **bake** your simulation locally and put the cache in the same zip as your `.blend` file. For more details see the [Fluid Simulations](/rendering-with-blender/fluid-simulations-with-mantaflow) guide.
## Useful Links
* [Using Fluid with Render Farms](/rendering-with-blender/fluid-simulations-with-mantaflow)
* [Using Simulation Nodes with Render Farms](/rendering-with-blender/simulation-nodes)
* [Preparing a project with Blend Project Packer](/renderjuice-101/blend-project-packer)
* [Preparing Your Project for Render Farms](/renderjuice-101/preparing-blender-file)
Having trouble or something doesn't seem right? Just chat with us—we're happy to help and respond quickly!
5. Click **Continue** to **validate** your scene and start your **render** 🎉.
Monitor the render to ensure your add-on is working as expected, if any issue detected cancel the render, to avoid wasting credits.
## What statuses mean
* **Validating** - Renderjuice is checking the archive structure and addon metadata.
* **Validated** - The add-on is ready to be selected in a render job.
* **Failed** - The archive could not be validated. Review the error in the Add-ons page, fix the archive, and upload it again.
## Common mistakes
* Uploading the original installer or website download archive instead of the installed add-on folder from Blender.
* Renaming the add-on folder before zipping it.
* Trying to use the add-on before validation finishes.
* Leaving packer-bundled add-on zips inside the project upload and expecting
Renderjuice to install them automatically.
* Assuming the add-on archive is enough when the scene also depends on baked caches or simulation data.
## Important Notes
* Monitor the render to ensure your add-on is working as expected, if any issue detected cancel the render, to avoid wasting credits.
* For some addons e.g Flip Fluid, you need to **bake** your simulation locally and put the cache in the same zip as your `.blend` file. For more details see the [Fluid Simulations](/rendering-with-blender/fluid-simulations-with-mantaflow) guide.
## Useful Links
* [Using Fluid with Render Farms](/rendering-with-blender/fluid-simulations-with-mantaflow)
* [Using Simulation Nodes with Render Farms](/rendering-with-blender/simulation-nodes)
* [Preparing a project with Blend Project Packer](/renderjuice-101/blend-project-packer)
* [Preparing Your Project for Render Farms](/renderjuice-101/preparing-blender-file)
Having trouble or something doesn't seem right? Just chat with us—we're happy to help and respond quickly!