

.blend on another machine. Blend Project Packer helps
you create an upload package that includes the scene file and the files your
scene depends on.
It checks the saved project, collects render dependencies, rewrites fragile paths
in a copy, and creates a portable folder or zip you can inspect before uploading.
Recommended workflow
Use this path when you want the safest first upload to Renderjuice.Install the extension
Install Blend Project Packer from the
Blender Extensions listing.After enabling it, open the 3D Viewport, press
N, and select the
Project Pack tab.Save your .blend
Save the project before packing. The packer reads the saved file on disk and
writes a separate portable copy, leaving your working
.blend unchanged.Leave output as Folder
Folder is the best default. It is faster than zip output and lets you
inspect the package before uploading.Use Zip only if you want the extension to create a single archive
directly.
Click Build Portable Package
The extension scans the scene, checks dependencies, and creates a portable
package beside the current 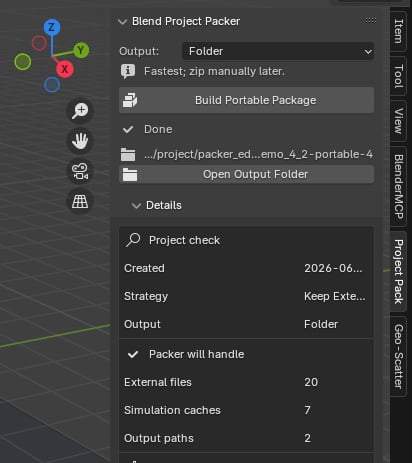
.blend unless you changed the output directory
in the extension preferences.Review warnings before continuing
If the project check finds missing files, unbaked caches, or add-on decisions,
Blender shows a review dialog.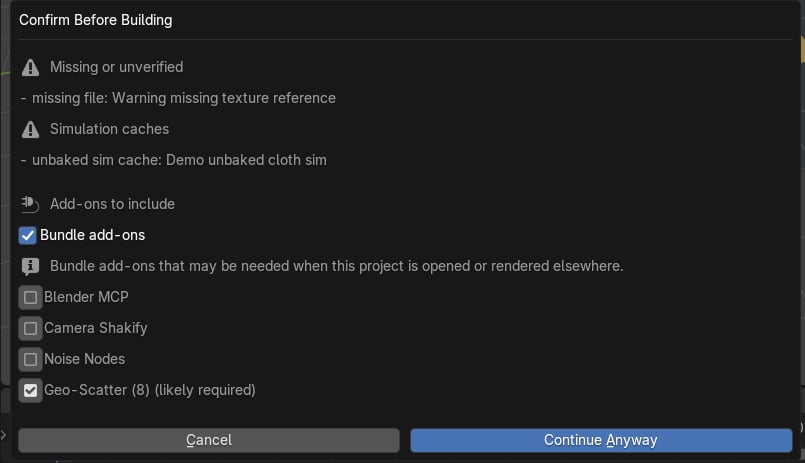
Upload add-ons separately if needed
If the review dialog lists add-ons that affect opening or rendering the scene,
keep the relevant add-ons selected so the packer can copy their installed
archives into the package.After packing, open the portable folder or zip and look under
addons/legacy/ and addons/extensions/. Upload each needed add-on zip on
the Renderjuice Add-ons page, wait for validation, then select those
add-ons in the render job.Follow
Using add-ons and extensions with Renderjuice
for the upload and selection steps.Zip and upload the package
If you used Folder output, zip the generated portable folder and upload
that zip to Renderjuice.If you used Zip output, upload the generated
*-portable.zip.If your scene depends on custom add-ons at render time, upload and select
those add-ons separately in Renderjuice. A project zip does not install
add-ons on the render node by itself, even when the packer bundled add-on
installation copies into the local package.What the packer checks
Blend Project Packer is useful when the project has more than a simple.blend
file:
- images, textures, image sequences, UDIM tiles, fonts, sounds, movie clips, or VDB files
- linked
.blendlibraries - Alembic, mesh cache, multires, or baked simulation cache folders
- compositor or render output paths outside the project folder
- add-ons that may affect opening or rendering the scene, so you know what to upload separately in Renderjuice
blend-project-pack.json, a packaging receipt with copied files,
path rewrites, linked-library scan results, cache moves, checksums, warnings, and
add-on decisions. You normally do not need to edit it.
Blender Pack Resources vs Blend Project Packer
Blender’s built-in File > External Data > Pack Resources is enough for some simple scenes. It embeds Blender-packable data into the.blend.
Blend Project Packer is for project packaging. Use it when Pack Resources
does not cover the whole render setup, especially when your project needs:
- cache folders that cannot be embedded into a
.blend - linked libraries and their dependencies
- image sequences or UDIM tiles expanded into actual files
- external render or compositor output paths rewritten to portable paths
- a preflight report before uploading to a render farm
.blend that opens and renders
correctly on another machine, you may not need the packer for that project.
What the output contains
The exact folders depend on your scene, but a portable package usually looks similar to this:How to read warnings
| Warning | What to do |
|---|---|
| Missing file | Relink the file or remove the unused reference before packing. |
| Unbaked simulation cache | Bake the simulation in Blender, save the .blend, then pack again. |
| Add-ons to include | Keep add-ons selected when they affect opening or rendering the scene, then upload the generated add-on zips separately through Add-ons. |
| Output paths outside the project | Let the packer rewrite them into the portable project. |
Boundaries
Blend Project Packer helps catch common portability problems, but it does not:- bake simulations for you
- recover files that are missing on disk
- prove that every custom add-on behaves correctly on Linux render nodes
- install add-ons on Renderjuice from the project zip
- submit the render job to Renderjuice